This will be the first post of a series of trying and hitting some 3D libraries in Java. So far I know two of them, JOGL – the more primitive one, and Java3D, which wraps the former.
Good tutorial on how to start using JOGL with Netbeans Platform’s window system has been written by Netbeans Platform guru GJ on here. I’ve tried that and successfully stuck on AMD_64.dll problem. It turns out that the culprit was merely a Java-32-bit-on-64-bit-OS problem.
In this post I will put a different, brighter story than that of JOGL integration. At least I could make it works.

Before we start, here are some stuffs to get
- Java3D examples source code : Pull SVN described here
- Java3D binary : Get the appropriate one for your OS here. I personally picked j3d-1_5_2-windows-i586.exe
- Netbeans. I use Netbeans 7.3
Cheat Sheet
Load pulled Java3D examples source code into Netbeans. You’ll see that this Freeform project contains a vast array of packages and seemingly useful examples.
Expand the org.jdesktop.j3d.examples.print_canvas3d packages and right-click PrintCanvas3D.java then select “Run File”. If you have correctly installed aforementioned Java3D binary, JFrame will appear. Try to click “File” menu on the top left. You’ll see that those three menu items will appear on top of the blue canvas behind.

Create Module
Create New Project -> NetBeans Modules -> Module. Right-click on module’s node on project explorer, select “New”->”Window”. If the “Window” option was not there, you can select “New” -> “Other” -> Module Development -> Window. Put window position field on “editor”. Click Next. Put any prefix you like (I use j3dCanvas). Click Finish.
On the Matisse editor (Design mode), add a new JPanel to the TopComponent, and set its layout as “BorderLayout”. Next, change JPanel’s variable name to drawingPanel.

First, refactor copy OffScreenCanvas3D.java from PrintCanvas3D.java‘s package to the same package as the TopComponent (this point onward, I’ll call it TC). Also, create new package and name it “resources”. Copy beethoven.obj from resources directory of j3d example to this package. You can find beethoven.obj using “Files” window.

Next, go to the Source mode of our TC, and copy some lines of code from PrintCanvas3D’s constructor into TC’s constructor. If a prompt pops and asks to resolve import elements, just click OK.
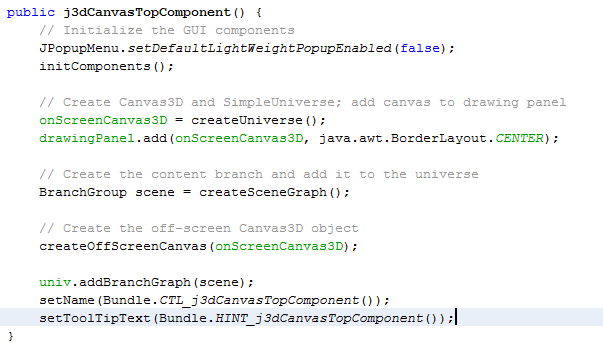
Copy createOffScreenCanvas, createSceneGraph, createUniverse method and variables declaration from PrintCanvas3D.java to TC. Modify filename variable declaration such that it points to the correct location of beethoven.obj. In my case, it is private URL filename = j3dCanvasTopComponent.class.getResource("/com/java3d/print/resources/beethoven.obj");
Right click on module’s node, and choose Run. If our TC is not opened yet, you can open it through Window menu. After TC is shown up, try click “File” menu on the top left and see what happens.

We’ll solve that glitch on the next post.